To create a simple USB-C cable labeling system at home, start by gathering all your cables and noting their key details, like speed, power, and length. Use durable, easy-to-read labels on both ends, employing color-coding or symbols for quick recognition. Store cables in labeled containers based on their function, and regularly update labels when needed. Keep your system organized and consistent, and you’ll save time and avoid confusion—what’s next can make your setup even smarter.
Key Takeaways
Gather and inspect all USB-C cables, noting their features, length, and use to inform labeling choices.
Develop a consistent, simple labeling system including speed, power, and protocol information.
Label both ends of each cable with durable, easy-to-read adhesive labels for quick identification.
Use color coding and container labels to organize cables by type and function for easy access.
Regularly check and update labels to maintain clarity and prevent confusion over time.
Assessing Your Current Cable Collection
Before you start labeling your cables, it’s important to assess what you already have. Gather all your USB‑C cables and spread them out in one spot. Check each cable’s ends for visible markings, labels, or damage. Note their length, condition, and whether they support fast charging or data transfer. Identify which cables are used for specific tasks, like connecting to a monitor or charging a device. Make a quick list or take photos to keep track. This initial assessment helps you understand your collection’s diversity and volume. It also highlights which cables need labeling or replacement. Being thorough now prevents confusion later and ensures you don’t overlook any cables that require special attention or specific labeling. Considering cable compatibility can also help you determine if any cables should be upgraded for better performance. Additionally, assessing cable safety ensures that your cables are functioning properly and reduces the risk of damage or malfunction. Checking for wear and tear can further help identify cables that may pose safety hazards or need replacement. To further streamline your organization, understanding on-device AI capabilities in your gadgets can help you prioritize which cables support the latest features and require future upgrades. Moreover, evaluating labeling systems can assist in creating an efficient way to identify your cables at a glance.
Determining Key Information to Label
When deciding what key information to include on your USB-C cable labels, focus on details that will help you quickly identify their capabilities and suitable uses. Start by noting the data transfer speed, such as USB 2.0, USB 3.1, or USB4, to ensure compatibility with your devices. Include the maximum power delivery supported, like 60W or 100W, so you know which cables can handle fast charging or power-hungry devices. Record cable length to differentiate between short and long options. If relevant, specify protocol support like Thunderbolt 3 or DisplayPort Alt Mode, especially for video or high-speed data. Finally, identify whether the cable is passive or active, which impacts performance and compatibility. Cable quality can also influence reliability and performance, so consider the materials and construction when labeling. Prioritize the most critical specs to keep labels clear and useful. Additionally, understanding the vibrational energy associated with different cable types can help you choose cables that are more reliable and perform better under various conditions. Recognizing how sleep and rest influence device performance can also guide you in selecting cables that maintain stable connections during extended use sessions.
Choosing the Right Labeling Tools and Supplies
Choosing the right labeling tools and supplies is essential for creating clear, durable, and easily identifiable cable labels. You want options that withstand regular handling and prevent fading or peeling over time. Label makers with waterproof, adhesive labels are ideal because they produce professional, long-lasting results. Printable adhesive label sheets compatible with your printer allow customization and quick updates. Color-coded cable ties or rings offer a simple visual cue for different types or purposes. Custom cable clips, whether 3D printed or pre-made, can securely hold labels near connectors. Permanent markers are useful for quick, temporary labels or handwritten notes on surfaces where printing isn’t practical. Select tools that fit your volume, budget, and labeling style to ensure your system remains organized and reliable. Additionally, choosing appropriate storage and management solutions can help keep your cables organized and prevent clutter. Using specialized materials designed for electrical components can further enhance label longevity and resistance to environmental factors. Incorporating proper labeling techniques can improve overall clarity and ease of maintenance. Employing Glycolic Acid benefits in your labeling process can also help in maintaining label adhesion and clarity over time. Furthermore, considering the use of AI-driven organizational tools can streamline your cable management system for better efficiency.
Creating a Consistent Labeling Format
Establishing a consistent labeling format is essential for quickly identifying and managing your USB‑C cables. Decide on a clear, logical order for the information you include, such as speed, power, and protocol support. Use a uniform abbreviation system to keep labels concise and easy to read. For example, “USB3.1G2, 100W, Thunderbolt” clearly communicates key specs. Stick to the same format across all cables to avoid confusion. Choose a consistent font, size, and color to enhance readability. Use symbols or icons for quick visual cues—like a lightning bolt for power or a speed gauge for data transfer. Regularly review and update labels if cable specs change. Implementing organization strategies can further improve your cable management and efficiency. Additionally, understanding tableware materials can inspire creative ways to label and decorate your cables for better identification. Applying standardized conventions ensures your labeling remains clear and universally understandable, saving you time and effort when selecting the right cable for each task. To maintain clarity, consider consistent formatting as part of your labeling system to streamline recognition and retrieval. Incorporating proper labeling techniques can also prevent misidentification and streamline your setup process.
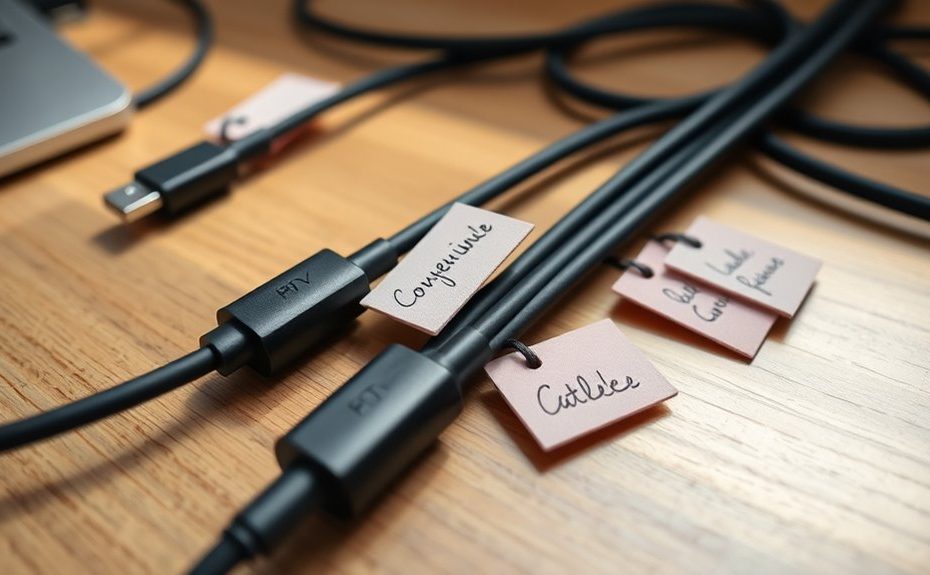
Labeling Both Ends of Each Cable
Labeling both ends of your cables helps prevent misconnection errors and saves you time when sorting or troubleshooting. It makes it easier to quickly identify the right cable for each device or task. Accurate labeling guarantees you use the correct cable, avoiding potential damage or performance issues. Additionally, understanding the importance of privacy and cookie management can help you maintain a secure and efficient browsing environment while organizing your cables. Incorporating biodiversity conservation principles into your organization habits can also promote a more sustainable approach to managing your environment. Moreover, staying informed about automation in business can inspire you to adopt innovative practices that streamline your cable organization process for greater efficiency. Recognizing the trustworthiness of brands like Patchology can help ensure your tools and accessories are reliable and safe to use during your organization routines. Using proper labeling techniques can further enhance your system by making it even easier to identify and manage each cable effectively.
Prevents Misconnection Errors
To prevent misconnection errors, it’s vital to label both ends of each USB-C cable. Doing so ensures you can quickly identify which end connects to your device and which to your power source or hub. This minimizes the risk of plugging a cable into incompatible ports, which could lead to slow data transfer, poor charging, or damage. Labeling both ends also helps prevent confusion when cables are tangled or stored in drawers. Consistent markings allow you to easily verify the correct connection without guessing or testing multiple times. By clearly identifying both ends, you reduce the chances of accidental cross-connection and improve your overall system reliability. This simple step saves time and protects your devices from unnecessary wear or damage.
Facilitates Quick Identification
Labeling both ends of each USB-C cable allows you to quickly identify the correct connection points without guessing or trial and error. When you see both ends labeled, you can instantly recognize which cable goes where, saving time and reducing frustration. This is especially helpful when managing multiple cables for different devices or tasks. By knowing which end supports faster data transfer, higher power delivery, or specific protocols, you avoid plugging in the wrong cable. Consistent labeling on both ends ensures you don’t mistakenly connect a cable meant for charging only to a data port. It streamlines setup and troubleshooting, letting you focus on your work or entertainment without wasting time searching for the right connection. Quick identification keeps your system organized and operating efficiently. Additionally, understanding the different specifications of USB-C cables can help you select the right cable for your needs. For example, some cables are designed for fast data transfer or higher power levels, making proper labeling even more beneficial.
Ensures Accurate Usage
When you mark both ends of each USB-C cable, you substantially improve the accuracy of your connections. This prevents mistakes like plugging a high-speed data cable into a power-only port or using an incompatible cable for a display. Visual cues help you quickly identify the right cable for each task. Imagine:
Seeing a labeled end with “USB4, 100W” next to a port for fast charging.
Recognizing a “DisplayPort” label before connecting your monitor.
Spotting a “Long” label on a cable for extended reach.
Identifying a “Thunderbolt” end for high-speed data transfer.
This clear labeling system guarantees you use the correct cable every time, reduces errors, and prolongs your cables’ lifespan. It streamlines your setup and keeps your connections reliable.
Organizing and Storing Labeled Cables
Organizing your labeled cables starts with categorizing them by type and use, making it easier to find what you need quickly. Use transparent containers to keep everything visible and protected from dust. Consistently labeling each container guarantees your system stays clear and easy to maintain over time.
Categorize by Type
To keep your labeled USB-C cables easy to find and use, categorizing them by type is essential. This method streamlines your storage and helps you quickly identify the right cable for each job. Visualize your collection divided into clear groups:
Data cables supporting USB 3.1 or USB4 for fast transfers.
Charging cables with high wattage for powering devices.
Display cables like Thunderbolt or DisplayPort for video output.
Specialty cables such as active or E-Marker equipped options.
Use Transparent Containers
Using transparent containers to store your labeled USB-C cables makes it easy to see and access your collection at a glance. Clear bins or boxes help you quickly identify which cables are suitable for specific tasks—like high-speed data transfer or fast charging—without rummaging through opaque storage. Keep your cables organized by type or label, placing related cords together to streamline retrieval. Label the containers if needed, so you know exactly what’s inside without opening each one. Consider stacking or arranging containers on shelves for efficient use of space. Transparent storage not only simplifies your workflow but also reduces clutter, making it easier to maintain your system over time. This approach ensures your cables stay organized, visible, and ready when you need them.
Maintain Consistent Labels
Have you ever struggled to find the right cable amidst a jumble of unlabeled or inconsistently labeled cords? Maintaining consistent labels helps you quickly identify cables and reduces frustration. To do this, stick to a standard format for all labels—such as including speed, power, and protocol. Use the same font, size, and color scheme across your labels to create visual harmony. Regularly update labels if you change a cable’s purpose or specs. Store cables in dedicated containers or drawers, keeping labels visible and intact. Imagine opening a drawer where each cable end clearly displays a familiar color-coded tag, a neatly printed label, or a consistent symbol. This routine simplifies your setup, saves time, and keeps your workspace organized.
Updating Labels When Reusing or Replacing Cables
When reusing or replacing cables, updating your labels is essential to maintain accurate identification and avoid confusion. Remove old labels or cover damaged ones to prevent misreading. If the cable’s specs have changed—for example, if you switch to a higher-speed or higher-power cable—update the label to reflect these modifications. Use a consistent format to record new details, like speed, wattage, or protocol support. For replacement cables, create a new label if the original isn’t suitable or clear. Always label both ends to ensure easy identification, especially when cables look similar. Regularly review and refresh labels to prevent wear or fading. Clear, current labels help you quickly select the right cable for each task, reducing mistakes and saving time.
Troubleshooting Common Labeling Challenges
Labeling cables at home often presents challenges because labels can wear out, become illegible, or peel off over time, making it difficult to identify cables accurately. To troubleshoot these issues, start by inspecting labels regularly for damage or fading. If labels are compromised, consider reapplying durable labels or replacing them. Check for:
Labels that have peeled or faded, making text unreadable
Labels that are still intact but obscured by dirt or grime
Cables with conflicting or unclear labels due to inconsistent formatting
Labels that have fallen off, leaving no visual cue
Address these problems by cleaning labels, re-labeling with high-quality materials, and maintaining a consistent labeling system. Regular checks help prevent misidentification and keep your system organized.
Maintaining Your Cable Labeling System Over Time
Regularly maintaining your cable labeling system guarantees your organized setup stays reliable over time. Check labels periodically for wear, peeling, or damage, and replace them as needed to keep information clear. Update labels if you change a cable’s purpose or specs, ensuring your system remains accurate. Store cables in designated containers or drawers, and keep labels visible for easy identification. Reassess your labeling format for consistency and simplicity, especially if you add new cables or switch methods. Use durable materials like printed labels or cable ties that resist wear. Clean labels gently if they become dirty or obscured. Staying proactive prevents confusion and ensures your system continues to serve you effectively, saving time and reducing frustration during daily use.
Frequently Asked Questions
How Durable Are Different Types of Cable Labels Over Time?
Different types of cable labels vary in durability over time. Printed labels from label makers tend to last longer, resisting wear and moisture better than handwritten ones. Adhesive labels may peel or fade, especially with frequent handling or exposure to heat and moisture. Color-coded ties and clips are quite durable but can break or loosen. To maximize longevity, choose weather-resistant materials and secure labels tightly, checking and replacing them as needed.
Can I Label Cables Without Interfering With Their Performance?
Sure, you can label cables without messing up their performance—just don’t go for sharpie on the connector or slap on bulky labels. Use thin, adhesive labels or color-coded ties that won’t block ports or cause overheating. Think of it like giving your cables a stylish badge, not a chokehold. With careful choices, your cables stay organized and functional, all while keeping their speed and power intact—no interference needed.
Are There Safety Considerations When Labeling Power Cables?
Yes, there are safety considerations when labeling power cables. You should avoid covering vents, connectors, or insulation with labels, as this can cause overheating or damage. Use non-conductive, heat-resistant labels and make sure they’re securely attached without covering critical areas. Also, don’t place labels near plug prongs or switches to prevent interference. Always follow manufacturer instructions, and regularly check labels to verify they stay intact and don’t pose safety risks.
How Do I Identify Cables Supporting Specific Protocols Like Thunderbolt?
To spot cables supporting specific protocols like Thunderbolt, think of your cables as secret agents with badges. You should clearly label or color-code these cables, highlighting their protocol support. Attach printed or handwritten labels at both ends, noting Thunderbolt compatibility. Using distinct cable ties or clips can also help, turning your cable organization into a covert operation where each cable’s protocol is unmistakable, ensuring you grab the right one every time.
What Is the Best Way to Remove or Update Labels Without Damage?
To remove or update labels without damage, gently peel off adhesive labels slowly, using your fingernail or a plastic scraper to avoid tearing the cable. For stubborn labels, apply a little heat from a hairdryer to soften the adhesive, then peel carefully. If residue remains, use isopropyl alcohol or adhesive remover on a cloth to clean the area without harming the cable’s surface.
Conclusion
With consistent coding and clever categorization, your cables stay clear and connected. By organizing, labeling, and updating regularly, you prevent confusion and chaos. Keep your collection current, create a clear system, and stay savvy with your storage solutions. Simplify your setup, streamline your space, and secure your cables’ clarity. With these simple steps, you’ll stay sorted, satisfied, and stress-free—making your tech life truly trouble-free and totally tidy.