Being asked to describe my painting technique is odd for me, and frankly it’s hard to do. I’m an intuitive painter, with no real process, I usually invent things as I go along – every painting becomes one big experiment. When I do it, I tend to learn a bit about myself, too.
My painting for this workshop is based on the HP Lovecraft story The Colour Out of Space, in which a meteor falls to Earth and lands on a family farm. The meteor emits strange radiation and gives off powers that alter life forms that come into contact with them. In the story the alien radiation drains life from its surroundings. Then fungus takes over and because of the unearthly radiation, is mutated in indescribable ways. The ‘colour’ in the title is an unseen spectrum of alien colours.
– Oil paints
– Paintbrush
– Graphite powder
– Canvas board
– Palette knife
– Mahl stick
The challenge here, then, is how to draw something that’s apparently undetectable. First I took a sketch out of my sketchbook from some years ago. It was simply a quick jot-down of ideas but as usual, I don’t spend a lot of time on the drawing – I tend to see how things go and rely on magic moments and accidents and hope for the best. I can already see the image.
Be sure to check out these oil paint supplies and best oil paints guides (and the materials we’ve found below) if you need some new kit. Or keep reading for how to paint glowing colours with oil paints.
01. Put your head in a book
Here’s my sketch (inspired by the works of Caspar David Friedrich). I took this out of my sketchbook (if you need a new one, see the best sketchbooks guide) and photocopied it to roughly 16×12 inches. My inspiration of mood comes from looking at the works of Caspar David Friedrich, who had a special look to his sublime works. I get a lot of mileage working from these books of classical painting. I recommend that every artist looks at classical works to help develop their own style.
02. No fuss, no bother
I take the photocopy of my old sketch and then blacken the back with graphite powder. I tape this to the top of the canvas board and then with a pencil, trace off major lines and objects, all very loosely. Once it’s down I work elements back in with a pencil, drawing back into the canvas more or less what things will look like. Again, I don’t fuss much because all this will be covered in paint. I spray the pencil drawing with fixative so that it stays visible when I’m painting over it. (Need a new canvas? Head to the best oil paint canvas guide.)
03. Start up the fun machine
I put the canvas on my easel. This is where the fun begins. I mix up some Alizarin yellow oil paint (it’s my favourite colour) with Walnut oil. A note on Walnut Oil, it’s actually non-toxic, but I wouldn’t drink it. I tend to avoid turpentine and thinners.
04. Remove your fear
I coat the canvas board completely. Picasso once said that the biggest fear in the universe is of a blank canvas. Well, we take care of that at the start. I see the underpainting as something to build everything on top of. Many of the classical artists did this. My underpainting will hopefully make the finished work glow. I take a rag and start removing paint, carving out the basic image based on the drawing and how the lighting will go (which I all see in my head).
05. Push and pull
I start working Burnt Umber into the painting, to generate some darker areas and also to define the overall composition. This is just a question of pushing and pulling the paint around the canvas. I add, subtract, dab more in, pull more out and start looking for the appearance of magic areas as the paint creates areas of interest. Then I set the work aside for the night and let it tack up, as we say, so that I can preserve what I’ve got going on. Hopefully, it’ll still look good in the morning!
06. Cool the paint with blues
Now it gets really interesting! The painting is set up nicely; it’s a little sticky, but I can work with it. I take a cheap bargain store bristle brush and start working in some blues, which helps to take down the warmth I’ve already created. I leave in little areas of light and shadow, and start to see more interesting areas. I begin with the tree and get some details going in the bark.
07. Make it happen
Out comes my oval-shaped palette knife and I start troweling in colour into the area of interest of the ‘colour’. I’m just kind of seeing what will happen. Palette knives are a lot of fun because if you have a textured board, the surprises can be pretty fun to watch happen.
08. Introduce small details
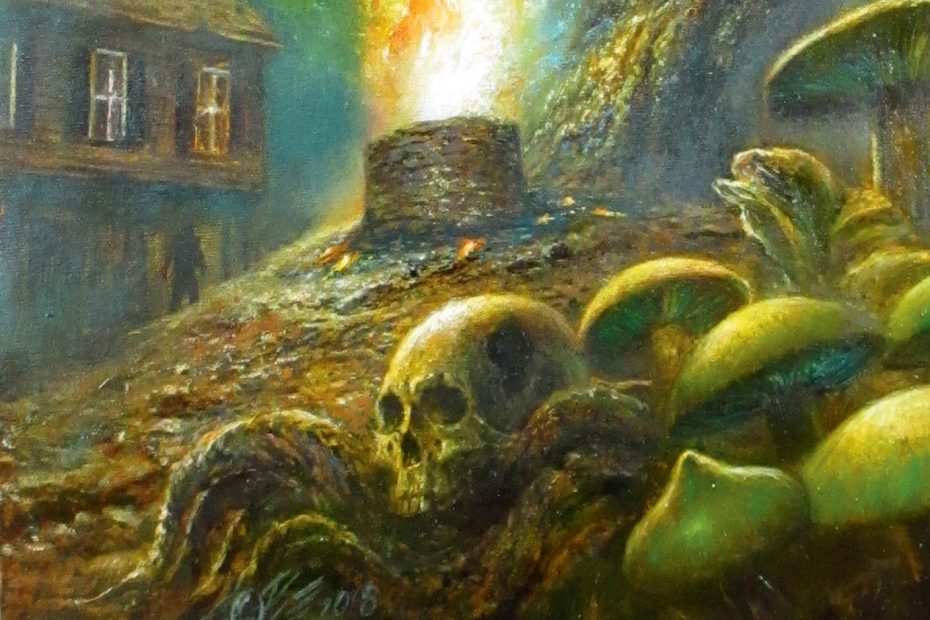
I start working in some details on the well, using a smaller brush. The strange alien force is at the bottom of a well, which I originally sketched while visiting a friend’s farmhouse some time ago. I start on the middle ground area and rely heavily on the texture of the canvas board to help me establish a rocky area. The underpainting helps me tremendously here.
09. Opposites attract
I continue detailing the tree branches. I decide that the shape of the ‘colour’ will be in contrast to the shape of the tree, which is twisted and dead.
10. Shape it up
At this point I start detailing the foreground and the skull. This is all a matter of impressionistic details. The roots of the trees and fungus are taking shape.
11. Give my hand a rest
I use a snooker cue to rest my hand on, much as you would with a mahl stick. It’s relatively cheap and does the job without getting too fancy. It’s good practice to rest your hand when bringing in details to a composition.
12. Use reference and memory
I turn my attention to the mushrooms and fungus. I use some reference books on mushrooms, but I tend also to work from memory, too. I’m not done with them and will come back to them in a bit. They need to tack up because my intention is to glaze some colour over them.
13. Do you see him yet?
Now I put in the farmhouse that’s in the background. Again, it’s not too detailed because it’s less important and, in this nighttime scene you wouldn’t see too much of it anyway. There’s also a figure there, and I like the fact that it takes a second look to see him. At this point the painting is near completion, but I still have things that I’ll tweak and come back to once I leave it to set overnight.
14. Foreground and background
I use a big wash brush – I think it’s meant for watercolours (for a range of kit, see this art supplies roundup) – to dab in a glaze of light blue over much of the background and the upper part of the tree. This helps to take things back a bit and get more into ‘lost edges’, which really make the 3D aspect of a painting work. The more diffuse your background looks, the more the foreground will pop out. This is my palette. It looks like a total mess, but there’s order in my chaos. My colours aren’t arranged in any particular order – I just squeeze out paint and hope for the best. It works for me.
15. Work in the evil
I work some green into the fungus to give it an unsettling, evil look. I work on the alien colour flare coming out of the well to make it looking a bit like a living thing. Subtly, it looks a bit like a DNA strand, which was probably my thought when I saw the shape I was creating and the fact that the alien light mutates and drains the life out of terrestrial organisms. Lovecraft’s fiction is indescribably hard to illustrate because he writes of things that would drive mortal man mad. But I like how it all worked out. I’ll coat the dry painting in spray-on retouch varnish. Oil paintings should wait a year to dry fully, before applying a final layer of varnish.
This article was originally published in ImagineFX, the world’s best-selling magazine for digital artists. Subscribe to ImagineFX here.
Related articles:
- Oil painting for beginners: 5 top tips to get you started
- How to paint a seascape using oil paints
- How to paint water in oils